Archive for the ‘The House’ Category

h1

What we’ve been doing all this time…

March 28, 2013

I think it’s safe to say this blog is dead. Sadly (or happily?) I have been busy with far too many other projects to maintain it regularly (read: at all), but on the off chance that any of those 50 daily hits that it’s still getting (still? seriously?!?) are live readers and not spambots, here’s a quick update on what we’ve been up to. Moving forward, I plan to use this space for occasional updates on specific projects, happenings, or other things I want to write about that maybe someone somewhere wants to read about, but don’t look for a return to regular posting any time soon (in case the two-year hiatus didn’t clue you in on that front).

Here are a few posts about what’s been keeping us busy, though.

First up: The kitchen!

1. We finished the kitchen! Huzzah! And it only took 29 months. (Okay, in fairness, it was functional far sooner than that, but the last few bits and pieces have dragged on and on, so we finally gave up and sought some help to push it over the finish  line.)

Here it is, in all its glory (albeit with some wonky lighting):

Remember what that used to look like? (Yeah, I know, I’m cheating because these are the night-before-demo photos so there’s no sunshine or accessories to spruce it up…but it really wasn’t so hot.)

I’m quite pleased with the first-time tile and flooring jobs we (by which I mostly mean D.) pulled off! The walls are actually a soft lime green; for some reason they look accurate on one computer screen and day-glo green on another, but rest assured that we did not save money by coloring them with highlighters. Someone described the color to me as looking like a lime daquiri, and that’s a pretty good approximation. (It’s Benjamin Moore Wales Green, for those who care about such things. The trim is Acadia White and the cabinets are Sea Haze.)

That was great before too:

I love love love my cookbook shelf! And didn’t D. do a nice job with the wood counter? Someday we’ll also get a new refrigerator so that’s why this one looks a little lost in the space, but for now it’s chugging along so we’ll see how many more years we can eke out of it first, especially since it (very surprisingly) turned out to be as energy-efficient as the new (but, granted, bigger) one will be when we cracked out the Kill-o-Watt. Ignore the undersized IKEA cart in the foreground; that’s one of the last few things we have to replace with an appropriately-sized kitchen work table. This photo was also taken before the shelving and shoe bench were in, so you’ll have to scroll down to get a glimpse of those.

I’m personally a big fan of the new-and-improved kitchen entry.

Here’s what we used to walk in to see:

And here’s what we see now. One of my silly goals of this project was to restore the through-the-house view of the gardens that was part of the original house plan, and I’m ecstatic that I can now sit in our living room and see our beautiful fruit trees! When we eventually get a new refrigerator, it will sit flush with the cabinets, so we’ll have an even better view.

P1000518

D. also tuned up the swinging door with a new hinge once we discovered the original one had been sawed and hammered beyond repair in an unsuccessful attempt to remove the door at some point. Turns out the hinge was bolted to the subfloor, so that’s why that didn’t pan out for whichever past owner was trying to get it loose… Note that it now opens into the kitchen, as it was intended to. (Pre-renovation, it only opened out into the dining room because that ceramic tile was too high for it to clear, which meant it blocked the door to the hallway that leads to the bathroom and bedrooms. Good thinking, past owners!)

The breakfast nook, still with its garden view, but with newly restored and trimmed windows. (Don’t look now, but this photo was taken before we installed the door thresholds! So pretend you don’t see the left corner.)

We restored the California cooler!

P1000504

We got a new-old back door from Ohmega Salvage that was a perfect fit for the opening, a new Douglas fir screen door, and I finally got my shoe bench and coat rack. (All that junk in the photo is not, in fact, what is supposed to go on these shelves, but right now we can’t store anything heavy down low.)

P1010996

We still have a little painting left to do here and there, but it’s pretty much a wrap. It was a long time coming—we demoed the old kitchen the first week of November 2010—but I’m loving the wonderful new space, and we even finished it on budget! Everybody around here loves it.

417431_10200778168241770_87021686_n

Next up: other things that have been keeping us busy (Hint: we are rocking that 2011 resolutions list!!)

h1

2011 House Resolutions

February 15, 2011

A little late, but hey. Setting the bar a bit lower on these this year given the total lack of progress on the 2010 list…so this one is short ‘n’ sweet.

1. FINISH THE KITCHEN.
This will actually get done, for no better reason than that is has to or we will go nuts! Still to do as of February 2011: painting, range hood vent, shelves, breakfast table and benches, shoe bench, backsplash tiles, butcher block counter, and rehanging the doors. Really not so bad considering where we started!

2. MEDICINE CABINET & BATHROOM PAINT.
Leftover from 2010.
We will install the medicine cabinet and paint the bathroom. No, really.

(I’m not getting too overly optimistic on the “To Do” list, though, so I’ll leave re-plastering the bathroom ceiling, which is currently threatening to come tumbling down, for 2012 or until it actually falls, whichever comes first.)

3. GARAGE SHELVES AND BIKE RACKS.
Leftover from 2010. Yeah. We will also do this in 2011, I swear!

4. CHICKENS FOR THE ‘HOOD.
Leftover from 2010. We’ll keep trying to get this together! Ever hopeful.

5. FRENCH DRAINS IN OUR FRONT YARD.
Because we need something new to do. The previous owner of our house did a lot of drainage work before selling it, but we still have one little section of the basement that gets water in heavy downpours. Unfortunately, this is also where we put the new furnace (there were good reasons for moving it and also some miscommunication on exactly where the designated spot would be, but it is what it is). So now we really need to fix the drainage. D. has been running test pumps this winter to try to pinpoint where we need to dig to get at the major problem sources, and I think he’s finally found it, or at least found a magic spot that seems to help a lot. So this spring, we need to get digging and route that water back down the hill and out of the basement. If we really get on a roll, this might expand to include tearing up the path in the backyard, digging french drains there too, and putting the path back. But really? That’s more likely to be 2013 or so…

6. ORGANIZE THE OFFICE (AKA THE SPARE BEDROOM)
We got really lazy about this one, and never got shelves for the second bedroom, so for the last few years everything’s been all over the floor in boxes. Which is kind of ridiculous given that we’re coming up on four years in this house in 2011! So sometime this year, we (by which I mostly mean D., since he uses this room as his office) will actually get some shelves and put some stuff on them.

…and that should keep us busy for most of the year, at least at the rate we’ve been going for the last year or so!

h1

Floored!

February 10, 2011

For a while now, actually, but I’m doing an extraordinarily bad job of keeping this blog updated…so I’ll play catch-up with some kitchen photos as we inch closer to finally wrapping this thing up! Here’s what we accomplished in December (along with some other fun but less photogenic things like electrical and plumbing work).

This is our shiny new Marmoleum Click tile from Anderson Carpet & Linoleum on Broadway, installed in December by D. (with a little bit of help from me!) The Labradane is a fan, or at least he became one once he got used to slip-sliding on it! He’s perfected the art of stopping mid-kitchen and sliding the rest of the way to the back door—but remarkably, two months later this stuff has yet to show many scratches to speak of. So that gets it a thumbs up from me!

Next up: What we did in January

h1

2010 House Resolutions Check-in: Jul…no, wait, December!

December 6, 2010

Whoops! In the chaos of the wedding, I somehow missed the June mid-year check-in on our house resolutions….which is just as well, since we are making very slow progress on them. But here’s a quick run-down of where we are with just days left to go:

1. A DISHWASHER.
Getting delivered this week! Actually, we’ve made lots of progress on this one, and with a little bit of luck, we will squeak in under the wire, with a working dishwasher (and kitchen!) in time for New Year’s Eve. !!!

2. HONEYBEES.
Done…for now. Hmm. So I took a great class at Her Majesty’s Secret Beekeeper in San Francisco to learn a little bit more about beekeeping…and I have to say that I’m not so sure it’s the right thing to add to to the mix right now. I did get a book that D.’s been reading, though, so if he gets excited enough about it to compensate for my trepidation, we might still give it a spin. But right now I’m thinking that (in the words of the class instructor!) I’m more interested in being a “bee haver” than a “bee keeper.” Time to plant some bee balm!

3. MEDICINE CABINET.
Halfway there. Well, so I have the medicine cabinet at long last…but it’s not installed yet. Also, painting the bathroom? Not done either. Argh. However, I think this one is getting close, since we now own the saw(s) needed to hack through the wall, and I now know how to drywall. Kind of. Bumping this to early 2011 at this point, since I don’t want to tear up the bathroom before we’re back in the kitchen.

4. LAWN LANDSCAPING.
Done! The grass is in! Still growing a bit slowly in spots, but it’s definitely grassy now.

Grass growing (a little!)

Grass growing (a little!) It's grown much more since this was taken.

5. HEAT REGISTERS.
Almost done! We ended up stripping and powdercoating the original registers (or rather, having someone else do this) after replacing them turned out to be trickier than I imagined. Now, to find the right size screws to put them back in the wall, since it turns out these aren’t readily available, and I should have kept track of the rusty stripped ones. D’oh.

6. GARAGE SHELVES AND BIKE RACKS.
No progress. Boo. This should be an easy one, too…bumping to next year, but inspired to get rolling on this as soon as the kitchen is done! On the upside, we got a new furnace as part of the kitchen remodel (yeah, don’t even ask…) and took the opportunity to move it to a side room in the basement, which means we now have a huge open space to play with in the main basement. Bike racks, here we come!

7. CHICKENS FOR THE ‘HOOD.
More talking, but still no action. We got as far as walking the space where the coops will go in our neighbor’s yard, but then the project stalled again. A friend of our neighbor’s is on board to help design it, though, so it’s looking promising for 2011. We’ll get there one of these years!

So, yes, it’s been an appallingly pathetic year for any project or activity not related to a) the wedding, b) work, or c) the kitchen. *sigh* There’s always next year…

h1

Our bungalow in a BOOK!

March 16, 2010

Or, to be a bit more accurate, on a book. Jane Smiley’s new novel Private Life, to be exact.

s-l640

This is a story of amazing discoveries:

First, a great-grandaughter of Walter and Mabel Kiedaisch, the couple who owned our home from 1921 to 1927, stumbled upon this blog last year after I posted a little history of our house. (Side note: We have now been in contact with five of the nine families who have lived here over the last century, including the family who built the home in 1915….that’s pretty amazing!) We’d known that Walter Kiedaisch was a photographer—and as it turns out, his great-granddaughter has his photograph archives. Lo and behold, she hunted down a snapshot of our house! (This is especially impressive given that she did this in part by looking at the little chopped-and-shopped graphic of our house in the corner of the homepage, which—though it is in fact adapted from a real photograph—takes a lot of artistic liberties…)

Then, even more astoundingly, Faber and Faber, a British publishing house, found the photograph on this blog while searching for pictures of Bay Area bungalows to use on the cover of the British edition of Private Life. (The moral of the story is: tag, and tag well!) They were good enough to write and ask for formal permission to use the image, and have included a photography credit for Walter Kiedaisch, fifty years after his death. And the icing on the cake: this gig even came with an honorarium for use of the photograph that, with the blessing of the Kiedaisch family, we asked the publisher to donate to the Oakland Heritage Alliance (OHA), where it will go to work preserving Oakland’s history (not to mention helping to fund the cool history lecture series and walking tours that OHA offers).

This experience was also a good lesson for me in learning to be less paranoid—my initial reaction to the email that showed up from the publishing house was “what kind of a scam could this be??” But a little digging on the interweb revealed that everyone was indeed who they said they were, and it was all real. So, working with three women I’ve never met on two different continents, we coordinated all of the logistics—and here it is!

I have yet to actually read the book—we haven’t received our copy yet as it doesn’t officially come out until May, so that’s a project for later this spring!—but I’m very curious, since the novel is about a young woman living in the Bay Area in the early 20th century with her naval officer/astronomer husband. I don’t think the book itself is set in Oakland—the few excerpts I’ve seen refer to a San Francisco naval base, which, in the 1920s, would likely have been Hunters Point in San Francisco, one of the first Pacific naval bases established. The Oakland Naval Reserve Air Base, located where the Oakland Airport is today, did not go into operation until 1928. Alameda Naval Air Station in West Alameda was acquired by the Navy in 1930, and Treasure Island, midway between San Francisco and Oakland, was the last to go to the Navy in 1940 as part of a land swap that got the City of San Francisco property near Millbrae to build the airport that is now SFO. But regardless of the setting, the novel should be an intriguing snapshot of Bay Area history. (Author Jane Smiley is a Northern Californian herself, so I imagine she had a chance to delve into all sorts of fun aspects of the history of this region.)

And speaking of Bay Area naval bases, here’s some fun trivia: in 1927, the Oakland City Council bought Bay Farm Island, now part of the city of Alameda except for OAK, to build the city an airport. A few months later, the Army got in touch to say they wanted to try the first flight from the mainland to Hawai’i, and wanted Oakland to build a runway for them. So, working 24 hours a day for three weeks (sound familiar, Caltrans??), Oakland crews built what was then the world’s longest runway, and on June 28, 1927, a flight from Oakland to O’ahu became the first successful flight to Hawai’i from the U.S. mainland. The Navy took over the next year, launching a long history of naval aviation in the East Bay.

Anyway, if for some reason you want to be the proud owner of a book with our house on the cover of it, you can get it here. (The photograph is only on the UK paperback edition of the book.) We’re picking up a few extra copies to pass along to any future owners of the house, too, since it’s such a fun story—and looks eerily the same as our house today. (And, of course, we’re ignoring the somewhat creepy sub-heading on the cover, given that we’re down to just a few months before our wedding….)

Turns out that a little history goes a long way!

h1

And the 2010 house resolutions!

January 4, 2010

Last week I gave the final rundown on the 2009 house resolutions, which means it’s time for (da-da-daaaa!) the 2010 list.

This year’s projects are mostly short and sweet, because we’re tackling one HUGE project and also getting married in June, so there will be more than enough things to occupy us. Still, there are some projects here I’m super excited about!

1. A DISHWASHER. Well, a whole new kitchen, actually. This a carryover from last year’s list. It’s our one huge gigantic project for this year after a year off from contractors—we did the electrical and seismic work back in 2008—and since we’re trying to do at least some of it ourselves, I’m expecting it to consume a lot of time.

2. HONEYBEES. Thanks to a little bit of a kick in the pants from my sister in the form of a gift certificate to Her Majesty’s Secret Beekeeper in San Francisco (thanks B!!), this jumped up our list a bit, and I can’t wait to get started on it! But first, I need to learn a little bit more about what I’m doing here—so look for more in the months to come.

3. MEDICINE CABINET. I’ve been procrastinating on getting a recessed medicine cabinet for the bathroom for a while, but I’m hoping to actually get moving on that this year, and also repaint the bathroom while I’m at it. This project is a bit daunting because it involves knocking holes in plaster, and I’m still not quite sure what we’ll find in there. (You can still see the shadows of the framing of the original cabinet, but I have no idea how or when it was filled in, or whether the framing is still intact.) We’ll see…

4. LAWN LANDSCAPING. We successfully killed all of our grass* this past year, but we haven’t done much with the space yet. Now it’s time to have some fun with the landscaping, and figure out what interesting natives we can put in. (*Note that by “grass” I do not mean oxalis, which is having a field day with our bare lawn…ack!)

5. HEAT REGISTERS. I started replacing these with functional reproductions this year, but got sidetracked when I discovered the moulding around the registers needed to be replaced. Hopefully I can check this one off the list pretty early this year…

6. GARAGE SHELVES AND BIKE RACKS. We’ve needed these forever, but it’s just never a very high priority project…maybe putting it on the resolutions list will make it one!

7. CHICKENS. Finally, though this may be a long shot, I’m hoping by the year’s end we’ll be involved in a chicken project either at our house or at our neighbor’s house (since they had the great idea of setting up a block chicken coop to share the responsibility and, more importantly, to house the hens somewhere where there is no big black dog!)

h1

Out with the old: Final 2009 house resolutions check-in

December 30, 2009

To wrap up 2009, here’s the status of this year’s resolutions. Look for the 2010 list next week!

Here’s the original list: My New Year’s House Resolutions

…and here’s where we are in the waning days of 2009:

1. BETTER WINDOW INSULATION.
Mostly done. In the end, I ordered 1 3/8″ spring bronze weatherstripping  from Kilian’s Hardware, since the stuff I got from our local Ace was too narrow. They shipped promptly and have everything under the sun on the old weatherstripping front. With instructions from Working Windows, a phenomenal guide, I’ll hopefully finish up the last of the weatherstripping soon. Pictures coming once I remember to take some. (I’m doing a modified version of it without removing the sashes—not the recommended way, but so far it seems to be working decently, and significantly reduces the likelihood that I’ll screw it up and need to call in the pros. But it also means I would be much happier with a staple gun, which the Tool Library has—except that they’re closed till after the new year with all the budget cuts…augh.) And the bedroom window issues will be resolved by early 2010—yay!

2. DROUGHT-TOLERANT LANDSCAPING.
Mostly done. We successfully killed the grass, but then went to war with the oxalis. This isn’t done yet, but it’s mostly because I’ve been lazy and preoccupied with other things. I think I can safely say it’s a weekend (and a few hundred dollars’ worth of DG, stones, mulch, and plants) away from being complete.

3. PRODUCTIVE VEGETABLE BED.
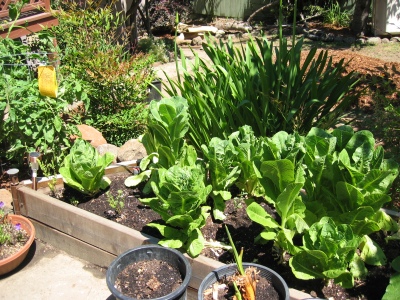
Done! The garden did quite respectably this year, though it’s definitely still a work in progress. I continue to be in awe of the huge yields from some friends’ gardens, so I’ll keep at it. I put cover crops in this winter, so hopefully that will help, too.

Lettuce bed

4. NEW POWER STRIPS.
Done! Pictures are not exciting here, so you don’t get any…

5. CLOTHES LINE.
Done! But no photos till we get the landscaping done, since right now the yard looks pretty icky.

6. NO MORE LEAKY TUB.
Umm, done? We got stuck on this one, so I’m not even sure it counts as done. Technically, it doesn’t leak anymore. But in the process of trying to fix it, we broke it more, had to hire a plumber to fix that, and then discovered that it had been fixed incorrectly. Fixing the new problem turned out to be an even bigger project that will entail retiling the bathroom, so for now we’re living with a slightly imperfect faucet setup. Moral of the story: hire people who know what they’re doing, especially when you don’t!

7. RAIN BARREL.
Mostly done. After trekking all over town looking for the specific parts D. had in mind for this, we finally found them at Grainger in West Berkeley. He’s off this week, so with luck this might be finished before the new year. Pictures and maybe an instructable to follow once it’s all installed and caulked in, but Gene over at DIY Insanity has some great photos up of the barrels pre-holes on the new platform he helped us build last month (and by “helped” I mean walked us through pretty much step-by-step—thanks again!!)

Gene's photo of the barrels on their brand new platform!

Gene's photo of the barrels on their brand new platform!

8. RETAINING WALL & FENCE.
Done!

Another view

9. DISHWASHER.
Not done. But…WE ARE GETTING OUR FIRST BIDS ON THE STRUCTURAL WORK IN THE KITCHEN! This is my most exciting news. It won’t make the 2009 list, but it’s within reach at long last. (And it better make the 2010 list…)

In fact, it might be fortuitous that it took so long—if Obama’s Cash for Caulkers program really gets rolling, we’re all set to buy both our dishwasher and new refrigerator under it! And we may apply to be guinea pigs in Oakland’s version of CaliforniaFIRST, which spreads the cost of energy efficiency improvements over a number of years by rolling the cost into property taxes. When we take out our furnace chimney, we’ll have to re-vent our furnace and water heater, and it might be the ideal time to replace both. (They still have a few years left in them, but both are aging, neither is high-efficiency, and D. is itching for a solar water heater.)

So we’re 8 for 9 for 2009—not too bad, actually!

h1

Kitchen Chronicles: Color inspirations

December 29, 2009

Initially, color seemed like one of those fun details that we could save till the end of the kitchen renovation process and have a little fun with. As it turns out, it’s a decision we need to make fairly early on in the process, since the color of the cabinets will drive a lot of design and cost decisions. (Specifically, we need to decide whether we’re doing painted cabinets or natural wood, since that in turn affects flooring choices and both affect the bottom line.) So I dug up several art pieces I’d been saving for a while and had them matted and framed over at Kuhl Frames + Art in Uptown. (Miraculously, I also got through the whole framing process without having to buy D. the Devo poster he’s been eyeing that’s part of the Lil Tuffy poster exhibit the shop is hosting right now! Yes, that would be the only poster in the whole show that costs more than all of our new appliances put together will…)

The first two pieces are old fruit labels that my aunt and uncle gave me years ago; I’ve been toting them around ever since (note the nice crease down the snow owl one!) I think they’ve been in no fewer than seven different apartments in five cities over the last decade—augh! So it’s long time they were framed. It’s hard to see, but the frames are actually a very deep brown with a light cream mat.

Fruit labels

The third piece is by Olympia-based artist Nikki McClure, who does crazy beautiful paper cuts. (I got this one at Issues off of Piedmont Avenue, where they usually have a nice assortment of her work.) Seriously, I’d wallpaper our house with these if D. didn’t have a say in it! (But he does, so we also have some old school Shepard Fairey from back when he was still counterculture. And also, cute photos of elephants with little children.)

Nikki McClure print

So obviously our kitchen is not going to be striped in red and black, but I do want a color scheme that this art can accent. We’re leaning strongly towards painted cabinets right now, and D. is adamant about not wanting a white kitchen, which is the more traditional “look” for an Arts and Crafts house. So instead, we’re exploring lighter creams, grays, or greens—plus a few natural woods—for the Shaker-style cabinets, probably with a wood floor and dark countertops. That actually gives me a nice palette to work with, since we can potentially keep the walls in the sage family, which makes the red and cream a perfect complementary color. Or we can use some yellows, which could look really nice with gray cabinets and red accents. I like the look of the green cabinets too (D.’s favorite is a color called “silver sage”) but it just seems like the kind of thing that we could get tired of in the years to come, and then we’re pretty locked into the color. Bleh.

Anyway, for now, I’m stalking Sunset, Apartment Therapy, Design Pad, and the many house blogs out there for some inspiration and ideas. Know anyone with good green, gray, or cream kitchen cabinets to look at?

h1

Kitchen Chronicles: The (not so) bad beginning

December 17, 2009

Yep, it’s that pesky kitchen again…

In the last episode, we discovered that there were far too many complicated and expensive things that needed to be fixed with our circa-1939 kitchen (with a 2007 “facelift”) for it to make much sense to do the project piecemeal. Instead, we started saving up for one big overhaul. We’re not quite there yet, but I’ve decided to go ahead and start working on the plan and talking to contractors so that we can get this thing rolling in the new year. Not exactly a bad beginning, per se, but certainly a far more expensive (and stressful!) one than we’d originally envisioned.

First things first: to save those of you who really don’t care about our kitchen from having to wade through what will probably be a LOT of posts about the renovation process in the coming year, I’m going to start titling and tagging any kitchen-related posts as “kitchen chronicles.” Read ’em if you like kitchens, or ignore ’em if you don’t.

Crafting the plan
One of the first things I did once we decided to tackle the entire space was to sit down and make a list of the current problems and the multiple roles we’d like the space to serve. Here’s how we envision it:

  • More light!
  • Better flow from the dining room into the kitchen into the breakfast room and out into the yard
  • Preserve the breakfast room function, if not the physical division of space
  • Allow the breakfast room to double as a mud room (which it sort of does now, but not terribly well)
  • Create space for the dog’s bowl and supplies
  • Create a continuous work surface somewhere in the kitchen itself
  • Eliminate the “wall” of cabinets that you walk into when you enter the kitchen from the dining room
  • Preserve the California cooler, the only original element in the kitchen
  • Preserve the ability to close the kitchen off from the rest of the house
  • Create a kitchen that fits into the historical aesthetic of the house

That’s a lot of different pieces and different jobs for a relatively small (13 feet by 17.5 feet, counting the breakfast room) space to fill. We’re still playing around with different configurations to get there, but right now, the plan is looking something like this:

Here’s what we’re starting with, as a refresher:
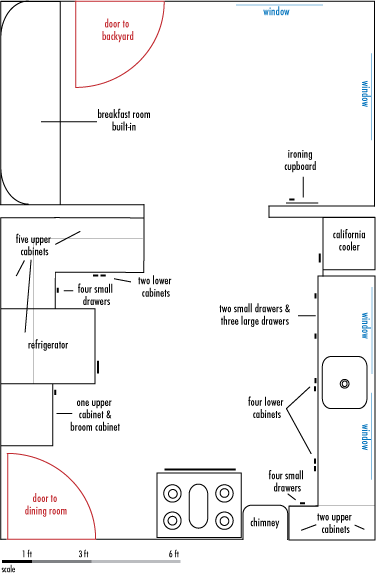
And here’s what we really started with, courtesy of our neighbor. This kitchen is actually  from the blueprints of our house’s mirror-image twin. I flipped it in Photoshop, but that would be why “screen” and “glass” are still backwards. (Or rather, I’m lazy and that’s why they are.) But you get the idea, and you can still see where the original walls and counters were, which is pretty crazy! In our house, the wall between the porch and the breakfast room was taken down as part of the 1939 remodel and the ironing board was moved.

1915 blueprints of our kitchen

The plan is still very much a work in progress and we have a lot of things to work out (like whether we can actually move the doorway, for starters—and if we do, how do we set it up so that the door closes, given that it’s a swinging door right now, and apparently you can’t put a pocket door in without stripping both sides of a wall down to the studs?) Our kitchen is awkwardly sized—too wide for a good galley layout, but too narrow to really accommodate an island. Most people with this layout—and there are a surprising number of them given how many bungalows are floating around town!—take out the cooler and stick the refrigerator there or make this into a U shape, but I really love our cooler and would hate to lose it. So, no U.

Kitchen Work Plan

  1. Disconnect and move stove and refrigerator; demo all cabinets. Remember to buy new toaster oven and borrow hot plate or microwave from somewhere before we get to this point!!
  2. Demo furnace chimney; re-vent furnace and hot water heater through wall or to exterior of house as needed. Explore the possibility of using the new Oakland iteration of CaliforniaFIRST to upgrade to a high-efficiency furnace and solar water heater at the same time.
  3. Remove tile floor, baseboard trim, sink backsplash, and washer/dryer hookups on breakfast room walls.
  4. Widen doorway between breakfast room and kitchen and figure out what kind of door to install here.
  5. Insulate outside wall behind sink, and add heat to the kitchen.
  6. Finish open walls and install new flooring and new trim to match the original.
  7. Install new cabinets, open shelves, sink, dishwasher, backsplash, etc.
  8. Install new counter. Paperstone, maybe?
  9. Install (or acquire freestanding) benches for breakfast room and mudroom areas. Install coat hooks.
  10. Install new light fixtures and exhaust hood.
  11. Replace back door with better insulated door. Yay Obama tax credits!

The million dollar question, of course, is how much all of this is going to cost. (Hopefully not a million dollars!) We’re on a pretty tight budget for this project, so the goal is to do as much of the work ourselves as seems feasible and wise. That probably means lots of fun demo-ing things, but leaving some of the finishing to the pros. I shipped off some paint and dust samples to be tested for lead a few months ago and was psyched to learn that the paint and plaster in the kitchen are effectively lead-free, so we can demo our hearts out. We also need to figure out where the cabinets are coming from. I’m getting a few estimates from local cabinetmakers, since that’s our ideal scenario—but we may end up back at Ikea if we can’t make it pencil out. We’ll see.

So with that—welcome to the City Homestead Kitchen Chronicles!

h1

Our house 85 years ago!

October 28, 2009

Another quick post, because as a lot of you know, we have been extremely busy the last few weeks with a number of things! (Updates coming soon…)

But I did receive this incredible photograph today from a great-granddaughter of the Kiedaisch family, who lived in our house from 1921 to 1927. She found my house history post earlier this year and, astoundingly, dug up a photograph taken of our house sometime in the mid-1920s by her great-grandfather Walter Kiedaisch, who was a Bay Area photographer.

ourhouse1920s

Our house circa mid-1920s (courtesy of the Kiedaisch family)

Even the small snapshot yields a lot of intriguing information:

The garage. We now know our garage is at least 80 years old! We’d talked to the City about this at one point since they had no record of the permits to build it; now I know why (and can conclusively prove that yes, it was definitely there when we moved in…) We’re pretty sure it isn’t original since it’s built up against the house and you can see where the doorways were modified at some point, but this means it was probably built by either the Kiedaisches themselves or by Joseph Smith, who owned the house from 1919 to 1921 after buying it from the original owners (who built it in 1915). The garage does have something of a 1920s vibe going on, too, so that would make sense. (Sadly, that look is almost gone today after the previous owner ditched the original garage doors and replaced them with a generic automatic door to get the house ready for sale. Convenient, but man, I wish she’d kept them…you can even still see them in the Google Street View photos of our block, which is just cruel!)

The adjacent rear lots. You can see the buildings on the lots behind us pretty clearly in this photo, which is interesting because both lots were redeveloped in the 1960s into apartment complexes. (The houses to either side of us, in contrast, look pretty much the same today.) I had envisioned cute little bungalows on these lots, and have often griped about how close to the lot line the 1960s developments were built. (Trying to figure out ownership of a shared fence last year, I even found a Planning Commission memo from the 1960s chiding one of the property owners for violating the property line setback rules; he was fined a relatively small amount and the building was unchanged.) As it turns out, though, even the original buildings must have been pretty close to the lot lines to be visible in this photo. (The one on the right looks like it’s practically in our next-door neighbor’s backyard—the condos there today have a bit of a buffer, at least!)

The front steps. We had wooden steps originally! (Our next-door neighbor still does and it’s pretty traditional for a California bungalow, so this isn’t totally surprising—but today the steps are concrete.) I am a little bummed, though, because when we had the foundation inspected recently in preparation for the kitchen remodel, the inspector oohed and ahhed over our concrete steps, noting that ours were in better shape than those of almost any other house its age that he’d seen. D’oh! Now I know why…

Otherwise, though, the house looks strikingly similar today, right down to the curves on the sidewalk. (Even the sidewalk itself looks like it might be the same…guess that really is due for replacement!) The front yard has since been terraced and landscaped, but we knew the previous owner had done a lot of that work, and from what our neighbor says, before then the yard looked, well, basically the same as it did in the 1920s. It’s very likely that this was the original paint job on the house, too, since it would have been barely ten years old (if that) when this photograph was taken. Hard to tell what the colors actually were, but it gives a sense of the aesthetic, at least. (The stucco on the side of the house behind the garage wall is cream, though, so that may have been the original color; in later years it appears to have been painted light green at some point.)

Anyway, just a very cool find! A huge thanks to Michelle for sharing this great piece of our home’s history!